Bunny Rabbit Cake Recipe – Easy & Adorable Treat
Bunny Rabbit Cake is more than just a dessert; it’s an invitation to embrace whimsy and joy! There’s something undeniably magical about a beautifully crafted cake that brings smiles to faces of all ages, and our delightful bunny rabbit cake recipe is sure to be a showstopper at your next celebration, or simply a reason to make an ordinary day extraordinary. We absolutely adore this cake because it taps into that childlike wonder, evoking images of Easter mornings and spring picnics. What truly makes this bunny rabbit cake so special is its versatility; you can customize the flavors, fillings, and decorations to perfectly suit your taste and the occasion. Get ready to hop into the kitchen and create a sweet masterpiece that’s as fun to make as it is to devour!
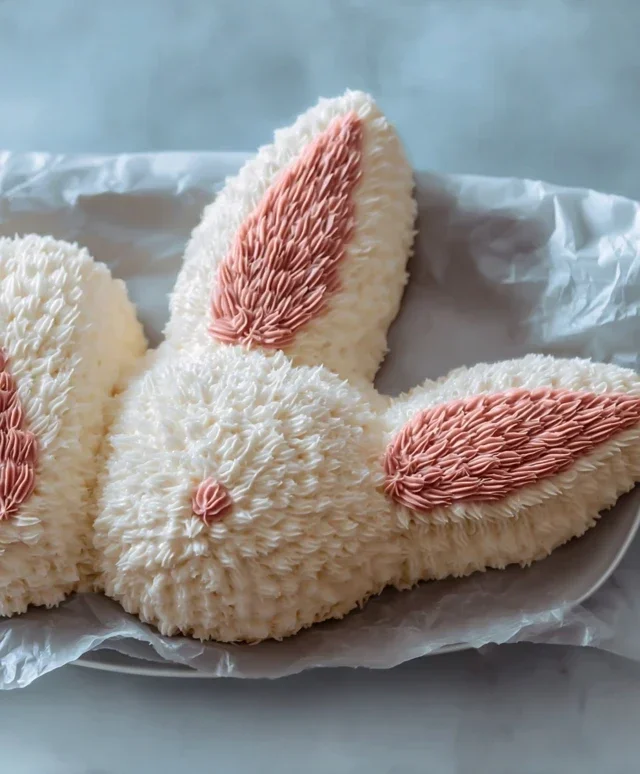
Bunny Rabbit Cake
There’s something undeniably charming about a bunny rabbit cake. Whether it’s for a spring celebration, a child’s birthday, or just a whimsical treat, this adorable cake is sure to bring smiles. Today, I’m going to walk you through how to create your very own fluffy bunny masterpiece. It’s not as complicated as you might think, and the joy it brings is absolutely worth it!
Ingredients:
Getting Started: Preparing Your Cake Layers
Before we can even think about transforming our cake into a bunny, we need to bake the foundational layers. This recipe uses simple ingredients that you likely already have in your pantry, making it an accessible and enjoyable baking project. I like to use a standard vanilla cake recipe as the base because it’s versatile and pairs wonderfully with most frosting flavors.
The key to a good cake is to ensure all your ingredients are at room temperature. This helps them to emulsify properly, resulting in a smoother batter and a lighter, fluffier cake. So, take out your butter, eggs, and milk at least an hour before you plan to start mixing.
Preheat your oven to 350°F (175°C). Grease and flour two 8-inch round cake pans. This step is crucial to prevent your cakes from sticking, and a little extra flour dusted over the greased pans can be your best friend. You can also line the bottoms with parchment paper for added security.
In a medium bowl, whisk together the flour, baking powder, and salt. This dry mixture ensures that your leavening agents and salt are evenly distributed throughout the flour, which contributes to a consistent rise and flavor. Set this aside for now.
In a large bowl, cream together the softened butter and granulated sugar until light and fluffy. This process incorporates air into the butter and sugar, which is another important factor in creating a tender cake crum extractb. It might take a few minutes with an electric mixer, but it’s well worth the effort.
Add the eggs one at a time, beating well after each addition. Then, stir in the vanilla extract. Next, gradually add the dry ingredients to the wet ingredients, alternating with the milk. Begin extract and end with the dry ingredients. Mix until just combined; be careful not to overmix, as this can develop the gluten in the flour and lead to a tough cake. A few small lumps are perfectly fine.
Divide the batter evenly between the prepared cake pans. Smooth the tops with a spatula. Bake for 30-35 minutes, or until a wooden skewer inserted into the center comes out clean. Let the cakes cool in the pans for about 10 minutes before inverting them onto a wire rack to cool completely. It’s essential that the cakes are completely cool before frosting, otherwise, your frosting will melt into a sticky mess!
Crafting the Bunny Shape
Now for the fun part – turning our round cakes into a bunny! Once your cakes are completely cool, it’s time to get creative. You’ll need a sharp knife for this step.
First, place one of the cooled cake rounds on your serving platter or cake board. This will be the bunny’s body. Take your second cake round and carefully cut it in half. These will form the bunny’s ears. Place the two half-circles standing upright on the top of the body cake, angled slightly outwards to resemble ears. You can trim the bottom edges of the ear pieces to help them stand up a little better if needed. If you’re worried about them sliding, you can use a little bit of frosting to “glue” them in place.
Whipping Up the Frosting and Decorating
Now for the fluffy white frosting that gives our bunny its signature look. In a large bowl, beat the butter until creamy. Gradually add the powdered sugar, alternating with the milk, until you reach your desired consistency. Beat in the vanilla extract. If the frosting is too thick, add a tiny bit more milk; if it’s too thin, add more sifted powdered sugar.
Assembling Your Bunny
Generously frost the entire cake, including the sides and the “ears.” Don’t worry about making it perfectly smooth; a slightly rustic texture will add to the charm and give the impression of soft fur.
Adding the Finishing Touches
This is where your bunny truly comes to life! For the bunny’s fur, I love to use shredded coconut. Generously sprinkle the shredded coconut all over the frosted cake. Gently press it into the frosting to help it adhere. This gives the cake a wonderfully fluffy and realistic texture.
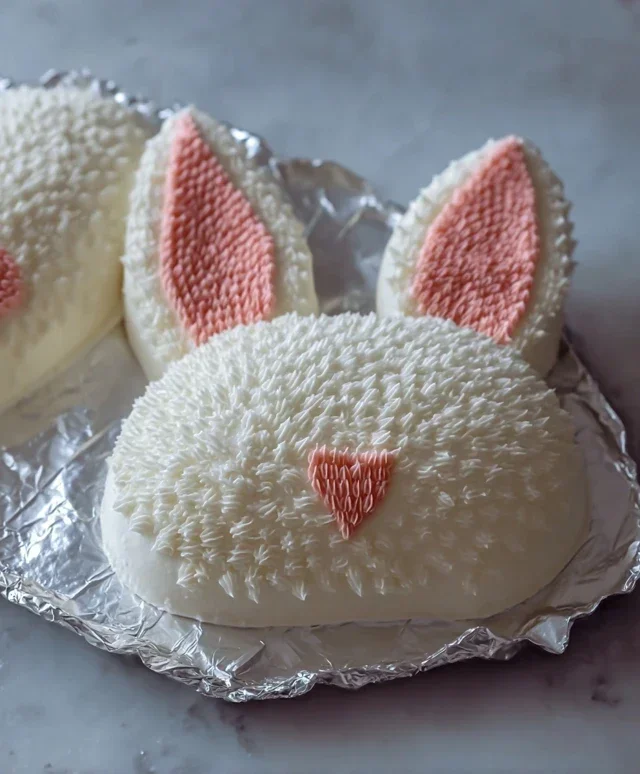
Now, let’s add the face. Use black decorating gel or melted chocolate to create two eyes and a nose. For a cute pink nose, you can mix a tiny bit of red food coloring into a small amount of frosting. You can also add tiny pink circles on the inside of the ears for an extra touch of sweetness. If you want to add rosy cheeks, very lightly dab a bit of red food coloring onto the sides of the bunny’s face with a clean fingertip or a small brush.
And there you have it – your very own adorable Bunny Rabbit Cake! It’s a delightful centerpiece that’s sure to be a hit with everyone. Enjoy the smiles and the deliciousness!
Conclusion:
And there you have it – your very own adorable Bunny Rabbit Cake! I hope you’ve enjoyed this journey of creating such a delightful and whimsical treat. This recipe is truly wonderful because it’s not only visually stunning, perfect for Easter, birthdays, or any spring celebration, but it’s also surprisingly achievable for bakers of all skill levels. The moist cake base and creamy frosting come together beautifully, making every bite a joy.
Serving suggestions abound! This Bunny Rabbit Cake is fantastic as the centerpiece for your dessert table, but it also makes a charming addition to a brunch spread. Imagin extracte it nestled amongst fresh fruit and pastries – pure springtime bliss. For variations, don’t hesitate to experiment! You could try a chocolate cake base for a richer flavor, or tint the frosting in various pastel colors. Adding edible glitter or sprinkles can enhance its festive charm. I truly encourage you to give this recipe a try; the smiles it brings are absolutely worth it!
Frequently Asked Questions:
Can I make this Bunny Rabbit Cake ahead of time?
Yes, absolutely! You can bake the cake layers a day or two in advance and store them well-wrapped at room temperature. The frosting can also be made ahead and refrigerated, then brought back to room temperature and re-whipped if needed. Assembling the cake a few hours before serving is ideal to allow the frosting to set properly.
What kind of frosting works best for decorating?
A sturdy buttercream frosting, like a Swiss meringue or American buttercream, is excellent for decorating this Bunny Rabbit Cake as it holds its shape well and is easy to pipe. Cream cheese frosting is also delicious but might be a bit softer, so ensure it’s well chilled if you’re aiming for intricate details.
Bunny Rabbit Cake
A delightful cake shaped like a bunny rabbit, perfect for Easter or any celebration. This recipe focuses on a classic vanilla cake with a creamy frosting.
Ingredients
-
2 cups all-purpose flour
-
1.5 cups granulated sugar
-
1 teaspoon baking soda
-
0.5 teaspoon salt
-
1 cup buttermilk
-
0.5 cup vegetable oil
-
2 large eggs
-
1 teaspoon vanilla extract
-
1 cup unsalted butter, softened
-
4 cups powdered sugar
-
2 tablespoons milk
Instructions
-
Step 1
Preheat oven to 350°F (175°C). Grease and flour a 9-inch round cake pan and a 1.5-quart oven-safe bowl. Prepare a bunny rabbit cake mold according to its instructions (if using a specific mold). -
Step 2
In a large bowl, whisk together the flour, sugar, baking soda, and salt. -
Step 3
In a separate bowl, whisk together the buttermilk, vegetable oil, eggs, and vanilla extract. -
Step 4
Pour the wet ingredients into the dry ingredients and mix until just combined. Do not overmix. -
Step 5
Pour the batter evenly into the prepared round cake pan and the oven-safe bowl. Bake for 30-35 minutes for the round cake, and 35-40 minutes for the bowl, or until a wooden skewer inserted into the center comes out clean. -
Step 6
Let the cakes cool in their pans for 10 minutes before inverting them onto a wire rack to cool completely. -
Step 7
While the cakes cool, prepare the frosting. In a medium bowl, beat the softened butter until creamy. Gradually add the powdered sugar, alternating with the milk, until smooth and spreadable. Add vanilla extract to taste. -
Step 8
Once the cakes are completely cool, arrange them on a serving platter to form a bunny shape. The round cake can be the body and the bowl-shaped cake (cut in half if needed) can be the head and ears. Use frosting to ‘glue’ the pieces together. -
Step 9
Frost the entire cake, using a spatula to create a smooth finish. Decorate as desired with frosting for eyes, nose, and mouth, and perhaps sprinkles for fur.
Important Information
Nutrition Facts (Per Serving)
It is important to consider this information as approximate and not to use it as definitive health advice.
Allergy Information
Please check ingredients for potential allergens and consult a health professional if in doubt.