Baklava Babka Buns- Deliciously Sweet Rolls
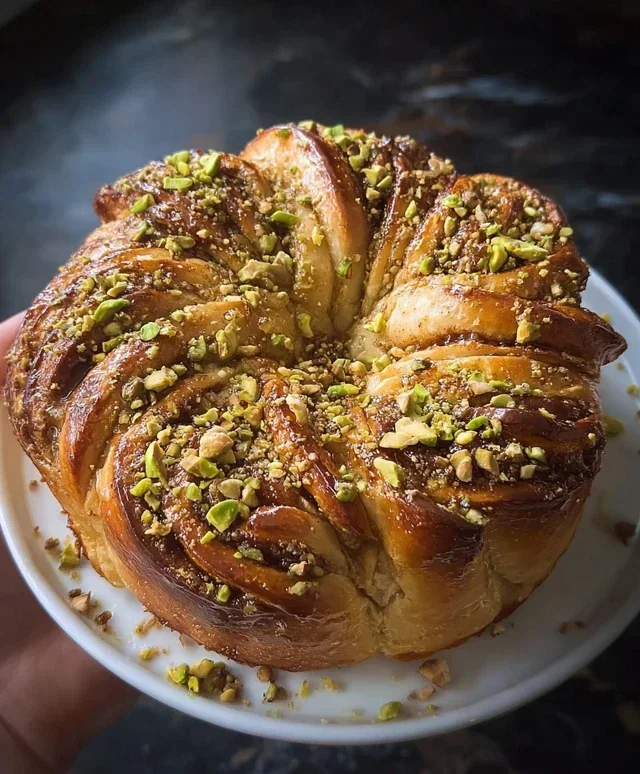
Baklava Babka Buns are the ultimate fusion dessert that you absolutely need to try. Imagin extracte the rich, nutty sweetness of classic baklava meeting the soft, swirled perfection of babka, all transformed into delightful, individual buns. It’s a match made in pastry heaven, and it’s no wonder these Baklava Babka Buns are rapidly becoming a fan favorite. People are drawn to them for that irresistible combination of textures – the crisp, syrupy layers giving way to a tender, doughy interior, all bursting with aromatic spices and chopped nuts. What truly sets these Baklava Babka Buns apart is their elegant presentation and the satisfying indulgence they offer. They’re perfect for sharing (or not!), making any occasion feel a little more special and a lot more delicious. Get ready to fall in love with this ingenious creation!
Baklava Babka Buns
Get ready for a treat that’s truly out of this world! Imagin extracte the flaky, syrupy goodness of baklava meeting the rich, swirled comfort of babka, all baked into delightful, individual buns. These Baklava Babka Buns are a labor of love, but the payoff is immense. Each bite offers a symphony of textures and flavors – the tender, slightly sweet dough, the crunchy, spiced nut filling, and the sweet, sticky honey syrup that ties it all together. They’re perfect for a special brunch, a delightful afternoon tea, or simply as a decadent dessert to share.
Ingredients:
Making the Dough
1. In a large mixing bowl, combine the 3 ½ cups of all-purpose flour, ¼ cup of granulated sugar, and ½ teaspoon of salt. Whisk these dry ingredients together to ensure they are evenly distributed. In a separate, smaller bowl, or in the bowl of your stand mixer if using one, add the packet of instant yeast to the ½ cup of warm milk. Let this mixture sit for about 5 minutes. You should see some foamy activity on the surface, indicating the yeast is alive and ready to work its magic. If it doesn’t foam, your yeast might be old, and it’s best to start with a fresh packet.
2. To the yeast and milk mixture, add the 2 eggs and the ½ cup of melted unsalted butter. Whisk these wet ingredients together until they are well combined. Now, pour this wet mixture into the bowl with the dry ingredients. If you’re using a stand mixer, attach the dough hook and mix on low speed until a shaggy dough begin extracts to form. If you’re mixing by hand, use a sturdy spoon or spatula to incorporate the wet and dry ingredients until they just start to come together.
3. Once the dough has formed a shaggy mass, continue to knead. If using a stand mixer, increase the speed to medium-low and knead for about 8-10 minutes, or until the dough is smooth, elastic, and pulls away cleanly from the sides of the bowl. It should be slightly sticky but not adhere excessively to your fingers when lightly touched. If kneading by hand, turn the dough out onto a lightly floured surface and knead for 10-12 minutes, pushing, folding, and turning the dough until it achieves that smooth, elastic texture. This kneading process is crucial for developing the gluten, which will give our buns their wonderful chewy texture.
4. Lightly grease a clean, large bowl with a little oil or butter. Place the kneaded dough into the bowl, turning it once to coat all sides. Cover the bowl tightly with plastic wrap or a clean kitchen towel. Place the bowl in a warm, draft-free spot to rise. This can be in a slightly warmed oven (turned off after preheating for a minute or two), or simply on your kitchen counter if your kitchen is warm. Let the dough rise for about 1 to 1 ½ hours, or until it has doubled in size. This is the first proofing stage, and it’s where the yeast does its primary work of creating those beautiful air pockets.
Assembling the Buns
5. While the dough is rising, prepare the glorious filling and the luscious syrup. For the filling, in a medium bowl, combine the 1 cup of finely chopped walnuts, ½ cup of finely chopped pistachios, ¼ cup of granulated sugar, and 1 tablespoon of cinnamon. Stir these ingredients together until they are well mixed. Set this aside. For the syrup, in a small saucepan, combine the ½ cup of honey, ¼ cup of water, and 1 teaspoon of vanilla extract. Heat this mixture over medium heat, stirring occasionally, until it just begin extracts to simmer. Once simmering, remove it from the heat and set it aside to cool slightly.
6. Once the dough has doubled in size, gently punch it down to release the air. Turn the dough out onto a lightly floured surface. Roll the dough out into a large rectangle, approximately 12×18 inches. Aim for an even thickness. Now, brush the entire surface of the dough evenly with the ¼ cup of melted unsalted butter. Don’t be shy with the butter; it will help create those wonderful flaky layers.
7. Evenly sprinkle the prepared nut and cinnamon mixture over the buttered dough, going all the way to the edges. Press the filling down gently with your hands or a rolling pin to help it adhere to the dough. Now comes the fun part: rolling up the dough. Starting from one of the longer sides, carefully and tightly roll the dough into a log. Try to keep the log as even as possible. Once rolled, pinch the seam closed to prevent the filling from escaping during baking.
Shaping and Baking
8. Now, we’re going to create the beautiful swirls of the babka. Using a sharp knife or dental floss (floss can make cleaner cuts), cut the log into 12 equal pieces, about 1 ½ inches thick each. You can use a ruler to ensure evenness. Place each piece cut-side up into a greased 9×13 inch baking pan. You can arrange them in rows or a more decorative pattern.
9. Cover the pan loosely with plastic wrap and let the buns rise for a second time for about 30-45 minutes, or until they are puffy and have filled out the pan. While the buns are proofing for the second time, preheat your oven to 350°F (175°C).
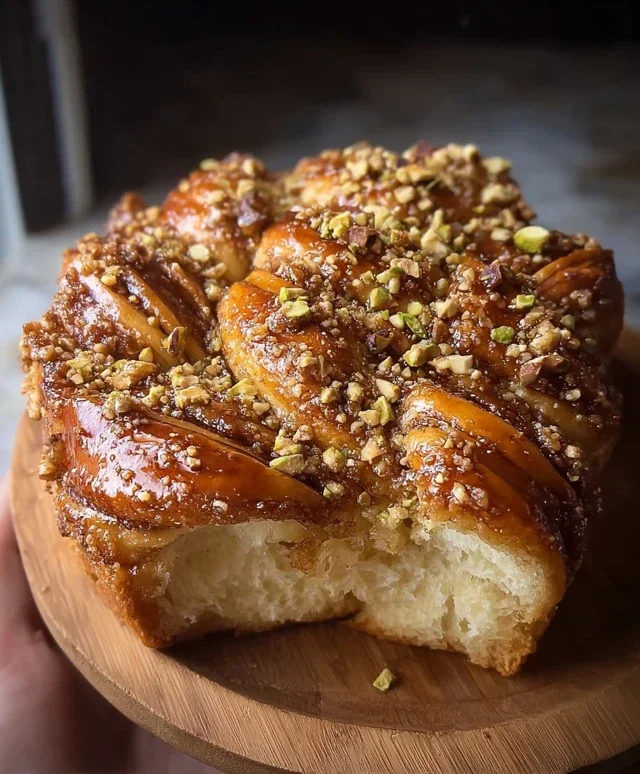
10. Bake the buns for 25-30 minutes, or until they are golden brown and cooked through. The tops should be nicely browned, and you might see some of the filling peeking out. As soon as the buns come out of the oven, while they are still hot, generously spoon the prepared honey syrup over the top of them. Let the buns cool in the pan for at least 15-20 minutes before attempting to remove them. This allows the syrup to fully absorb and the buns to set. Enjoy these incredible Baklava Babka Buns warm!
Conclusion:
And there you have it – your guide to creating these irresistible Baklava Babka Buns! This recipe truly marries the best of two beloved desserts, offering a delightful textural contrast with the rich, flaky layers of baklava infused with the soft, yeasted dough of babka, all swirled with a decadent nutty filling. It’s a showstopper for any occasion, whether it’s a holiday brunch, a special dessert, or just a treat to brighten your day. I encourage you to dive in and experience the magic yourself!
These buns are wonderfully versatile. Serve them warm, perhaps with a dollop of Greek yogurt or a scoop of vanilla bean ice cream. They pair beautifully with a strong cup of coffee or a sweet dessert grape juice. For variations, consider adding finely chopped pistachios to the filling for an extra crunch, or a touch of orange blossom water to the syrup for a more floral note. You could even experiment with different nuts like walnuts or pecans.
Don’t be intimidated by the process; the payoff is absolutely worth the effort. Get ready for rave reviews!
Frequently Asked Questions:
Can I make the Baklava Babka Buns ahead of time?
Yes, you absolutely can! You can prepare the dough and the filling the day before and refrigerate them. For the assembled buns, you can let them proof in the refrigerator overnight and bake them in the morning. Just ensure they come to room temperature for a little while before baking to ensure even cooking.
How should I store leftover Baklava Babka Buns?
Store any cooled Baklava Babka Buns in an airtight container at room temperature for up to 2-3 days. If you live in a particularly warm or humid climate, refrigeration might be best to maintain their texture, though they might firm up slightly. Gently rewarm them in a low oven or toaster oven before serving for the best experience.
What if I don’t have all the ingredients for the traditional filling?
Feel free to adapt! If you’re missing walnuts, pecans or even a mix of chopped almonds would work wonderfully. For the syrup, if honey isn’t your preference, a simple sugar syrup with a hint of lemon or cinnamon can be used. The spirit of this Baklava Babka Bun recipe is about rich, sweet indulgence, so get creative with what you have!
Baklava Babka Buns
A delightful fusion of classic baklava flavors and the soft, swirled texture of babka, baked into individual, sweet buns.
Ingredients
-
3 ½ cups all-purpose flour
-
¼ cup granulated sugar
-
1 packet (2 ¼ tsp) instant yeast
-
½ cup warm milk
-
2 eggs
-
½ cup unsalted butter, melted
-
½ tsp salt
-
1 cup walnuts, finely chopped
-
½ cup pistachios, finely chopped
-
¼ cup granulated sugar
-
1 tbsp cinnamon
-
¼ cup unsalted butter, melted
-
½ cup honey
-
¼ cup water
-
1 tsp vanilla extract
Instructions
-
Step 1
In a large bowl, whisk together the flour, sugar, yeast, and salt. Make a well in the center and add the warm milk, eggs, and ½ cup melted butter. Mix until a shaggy dough forms. -
Step 2
Turn the dough out onto a lightly floured surface and knead for 8-10 minutes until smooth and elastic. Place the dough in a lightly oiled bowl, cover, and let rise in a warm place for 1 hour, or until doubled in size. -
Step 3
While the dough is rising, prepare the filling. In a bowl, combine the chopped walnuts, chopped pistachios, ¼ cup sugar, and cinnamon. -
Step 4
Punch down the risen dough and divide it into 12 equal portions. On a lightly floured surface, roll each portion into a rectangle. Spread the butter mixture evenly over each rectangle, then sprinkle with the nut and cinnamon filling. -
Step 5
Carefully roll up each rectangle tightly, then cut the rolled dough lengthwise into two halves. Twist the two halves together to create a swirl, then shape into a bun and place on a baking sheet lined with parchment paper. -
Step 6
Bake in a preheated oven at 375°F (190°C) for 20-25 minutes, or until golden brown. -
Step 7
While the buns are baking, prepare the syrup. In a small saucepan, combine the honey, water, and vanilla extract. Bring to a simmer and cook for 2 minutes. Let cool slightly. -
Step 8
Once the buns are out of the oven, immediately brush them generously with the honey syrup. Let cool on the baking sheet for a few minutes before transferring to a wire rack to cool further.
Important Information
Nutrition Facts (Per Serving)
It is important to consider this information as approximate and not to use it as definitive health advice.
Allergy Information
Please check ingredients for potential allergens and consult a health professional if in doubt.