Cherry Cheesecake Hand Pies- Delicious Easy Treats
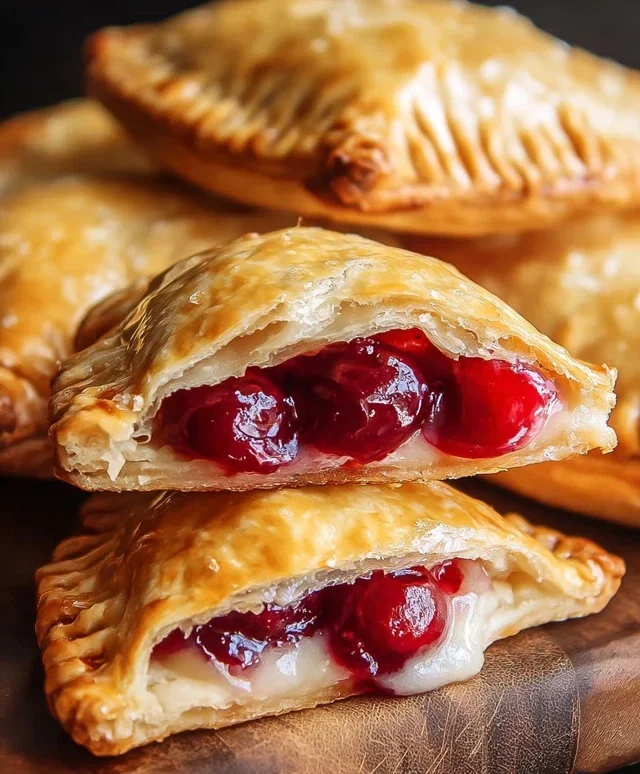
Cherry Cheesecake Hand Pies are an absolute game-changer for dessert lovers everywhere. Imagin extracte the rich, creamy indulgence of classic cheesecake, perfectly paired with the sweet-tart burst of cherries, all encased in a flaky, golden crust. What’s not to adore? These delightful little pockets capture the essence of our favorite holiday dessert but in a portable, perfectly portioned package that’s ideal for sharing (or keeping all to yourself!). We love them because they deliver that unmistakable cheesecake flavor and comforting texture without the fuss of a whole pie. The magic of these Cherry Cheesecake Hand Pies lies in their ingenious design – a delightful duality of sweet and tangy filling embraced by a tender, buttery pastry. They’re sunshine in every bite, perfect for picnics, potlucks, or simply when that cheesecake craving strikes!
Delicious Cherry Cheesecake Hand Pies: A Sweet Treat You’ll Love!
There’s something undeniably comforting about a warm, sweet treat, and these Cherry Cheesecake Hand Pies deliver that joy in perfect, portable portions. Imagin extracte flaky, golden-brown pastry encasing a luscious, creamy cheesecake filling studded with sweet, tart cherries. These little pockets of happiness are surprisingly easy to make and are guaranteed to be a hit at any gathering, or just for a delightful afternoon pick-me-up. Forget fussy cheesecakes; these hand pies are all the flavor with none of the fuss!
Ingredients:
Getting Started: Preparing the Creamy Filling
The heart of any great cheesecake is, of course, the cream cheese filling. For our hand pies, we’re keeping it simple but incredibly effective. In a medium bowl, I like to combine the softened cream cheese with the granulated sugar. Softened cream cheese is crucial here; it ensures a smooth, lump-free filling. If your cream cheese is still a bit firm, you can gently warm it for a few seconds in the microwave, but be careful not to melt it completely. Creaming the sugar into the softened cream cheese until it’s light and fluffy is key for that classic cheesecake texture. Once that’s well combined, we’ll gently fold in the glorious cherry pie filling. Don’t overmix at this stage; we want to maintain some of those delightful cherry chunks. The combination of creamy tang from the cream cheese and the sweet-tart burst of cherries is what makes these hand pies so irresistible.
Assembling Your Hand Pies
Now comes the fun part: assembling these sweet parcels. Start by unrolling your refrigerated pie crusts onto a lightly floured surface. Since each package typically comes with two crusts, you’ll have enough for a good batch. I like to use a round cookie cutter or even the rim of a glass (about 4-5 inches in diameter) to cut out circles from each crust. This ensures uniformity, which is nice for even cooking and presentation. You should aim to get about 6-8 circles from each crust, depending on your cutter size.
Once you have your circles, it’s time to fill them. Place about 1-2 tablespoons of the prepared cherry cheesecake filling onto one half of each pie crust circle, leaving a small border around the edge. Be careful not to overfill, as this can make sealing difficult and lead to leaks during frying. Now, take the other half of the pie crust circle and carefully fold it over the filling to create a half-moon shape.
Sealing and Crimping for Perfectly Fried Pies
The seal is paramount for hand pies, especially when deep frying. You want to ensure that delicious filling stays inside while the pastry crisps up beautifully. After folding the crust over, gently press the edges together with your fingers. To create a really secure seal and give your hand pies a classic, rustic look, I like to use a fork. Simply press the tines of the fork all around the edges of the folded crust. This not only seals them tightly but also creates those lovely decorative ridges. If you notice any small tears or thin spots in the crust, you can gently pinch them together. A good seal prevents any filling from escaping into the hot oil, which can cause splattering and a less attractive final product.
The Art of Deep Frying Your Hand Pies
This is where the magic happens, transforming simple dough into golden, crispy perfection. You’ll need a deep, heavy-bottomed pot or a Dutch oven for this. Fill it with about 4-6 cups of vegetable oil. It’s important to have enough oil so that your hand pies can float freely. Heat the oil over medium-high heat until it reaches about 350°F (175°C). If you don’t have a thermometer, you can test the oil by dropping a tiny piece of pie crust into it. It should sizzle and float to the surface immediately.
Carefully, using a slotted spoon or tongs, place 2-3 hand pies into the hot oil at a time. Don’t overcrowd the pot, as this will lower the oil temperature and result in greasy pies. Fry them for about 2-3 minutes per side, or until they are a beautiful golden brown. Keep an eye on them as they can brown quickly. The pastry should be puffed up and crisp.
Draining and Glazing for the Finishing Touch
Once your hand pies are perfectly golden, carefully remove them from the hot oil with a slotted spoon. Place them on a wire rack set over a baking sheet or on a plate lined with paper towels. This allows excess oil to drain off, ensuring they stay nice and crisp. While the pies are still warm, it’s time for the final, irresistible touch: a simple glaze. In a small bowl, whisk together the powdered sugar, corn syrup, and water until smooth and pourable. The corn syrup adds a lovely shine and helps the glaze set slightly. Drizzle this glaze generously over the warm hand pies. The warmth will help the glaze melt slightly and create a beautiful sheen. Let the glaze set for a few minutes before serving.
These Cherry Cheesecake Hand Pies are best enjoyed warm, but they’re also delicious at room temperature. They are the perfect treat for picnics, parties, or just a cozy night in. Enjoy!

Conclusion:
I hope you’re as excited about these Cherry Cheesecake Hand Pies as I am! They truly are a delightful way to enjoy the classic flavors of cheesecake and cherries in a portable, utterly charming package. The flaky, buttery crust enveloping a creamy, tangy cream cheese filling studded with sweet-tart cherries makes for an irresistible treat. They’re perfect for picnics, parties, bake snon-alcoholic ales, or simply as a special indulgence with your afternoon coffee or tea. Don’t hesitate to whip up a batch – you’ll be amazed at how quickly they disappear!
For serving, I love them slightly warm, allowing the filling to be perfectly gooey. They’re also fantastic at room temperature. If you’re feeling adventurous, consider adding a drizzle of white chocolate or a dollop of whipped cream on top. You can also explore different berry combinations; a mixed berry or even a single-berry version would be lovely.
Frequently Asked Questions:
Can I make the dough ahead of time?
Absolutely! The pie dough for these Cherry Cheesecake Hand Pies can be made up to 2-3 days in advance and stored, tightly wrapped, in the refrigerator. You can also freeze the dough for up to a month and thaw it overnight in the fridge before using.
How should I store leftover hand pies?
Store any leftover hand pies in an airtight container at room temperature for up to 2 days, or in the refrigerator for up to 4 days. For the best texture, you might want to gently reheat them in a toaster oven or a low oven for a few minutes before serving.
Can I use fresh cherries instead of frozen?
Yes, you can! If using fresh cherries, you’ll want to pit them and then slice them. You might need to cook them down slightly for a few minutes to release some of their juices before adding them to the filling, similar to how you would prepare the frozen ones.
Cherry Cheesecake Hand Pies
Delicious and easy hand pies filled with creamy cheesecake and sweet cherry pie filling, perfect for a treat.
Ingredients
-
1/4 cup granulated sugar
-
4 oz cream cheese, softened
-
21 oz can cherry pie filling
-
1 package refrigerated pie crust (2 crusts)
-
1/2 cup powdered sugar
-
1 teaspoon corn syrup
-
1 tablespoon water
-
Vegetable oil, for deep frying (about 4-6 cups)
Instructions
-
Step 1
In a small bowl, beat softened cream cheese with 1/4 cup granulated sugar until smooth. -
Step 2
Unroll refrigerated pie crusts and cut out 6-inch circles. Use a bowl or cookie cutter as a guide. -
Step 3
Place a spoonful of the cream cheese mixture onto one half of each pie crust circle. Top with a spoonful of cherry pie filling. -
Step 4
Fold the other half of the pie crust over the filling to create a half-moon shape. Crimp the edges with a fork to seal. -
Step 5
Heat vegetable oil in a deep fryer or large, heavy-bottomed pot to 375°F (190°C). -
Step 6
Carefully fry hand pies in batches for 2-3 minutes per side, until golden brown and puffed. -
Step 7
Remove hand pies from oil and drain on paper towels. -
Step 8
In a small bowl, whisk together 1/2 cup powdered sugar, 1 teaspoon corn syrup, and 1 tablespoon water until smooth. Drizzle over the warm hand pies.
Important Information
Nutrition Facts (Per Serving)
It is important to consider this information as approximate and not to use it as definitive health advice.
Allergy Information
Please check ingredients for potential allergens and consult a health professional if in doubt.