Easter Chocolate Lasagna-Decadent Dessert Recipe
Easter Chocolate Lasagna is more than just a dessert; it’s a celebration in a pan! This year, forget the traditional beef ham and embrace a sweet sensation that will have everyone asking for seconds. We all know how much joy a good chocolate treat brings, and when Easter rolls around, our cravings for something decadent and festive reach a whole new level. What makes this particular Easter Chocolate Lasagna so special? It’s the delightful layers of creamy, dreamy goodness, the satisfying crunch of cookie crum extractbs, and the rich, intense chocolate flavor that dances on your palate. It’s the perfect way to end your Easter feast, offering a delightful twist on a classic dessert that’s surprisingly easy to assemble and utterly irresistible.
Why You’ll Fall in Love
Get ready for a showstopper!

Easter Chocolate Lasagna
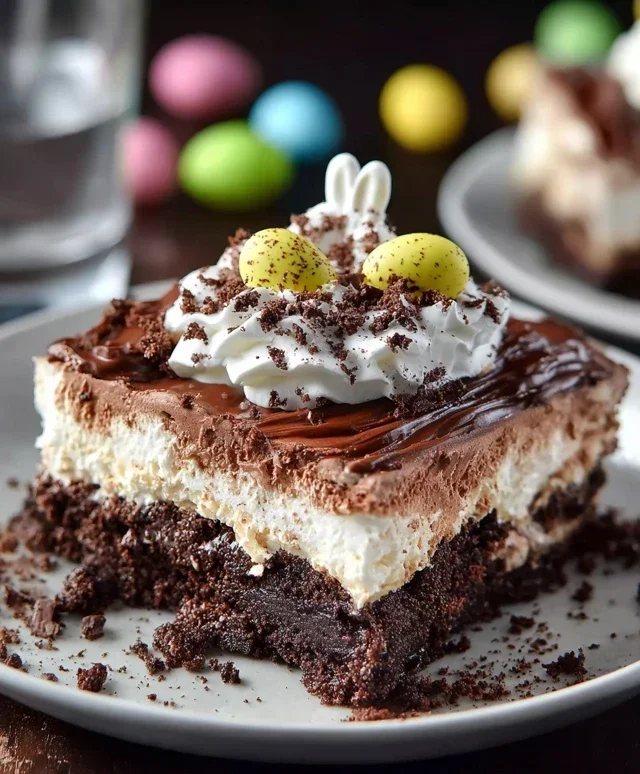
Get ready to impress your friends and family this Easter with a dessert that’s as delightful to look at as it is to eat! This Easter Chocolate Lasagna is a showstopper, layering creamy, chocolatey goodness with a crunchy cookie crust. It’s the perfect festive treat to brighten up your holiday table. Don’t let the name “lasagna” fool you; there’s no pasta involved, only pure, unadulterated dessert bliss. The layers come together beautifully, creating a symphony of textures and flavors that will have everyone reaching for a second (or even third!) slice. It’s surprisingly easy to make, making it a fantastic option for busy hosts.
Ingredients:
Instructions:
Step 1: Prepare the Oreo Crust
First things first, we need to create that irresistible crunchy base. Take your 36 Oreo cookies and either place them in a food processor and pulse until they form fine crum extractbs, or put them in a sturdy zip-top bag and crush them with a rolling pin. The finer the crum extractbs, the more cohesive your crust will be. In a medium bowl, combine the Oreo crum extractbs with the ½ cup of melted unsalted butter. Stir until all the crum extractbs are thoroughly moistened. This buttery mixture will hold together to form a solid base. Press this mixture firmly and evenly into the bottom of a 9×13 inch baking dish. I like to use the bottom of a measuring cup or a flat-bottomed glass to get a really even and compact layer. This step is crucial for a good crust, so take your time to ensure it’s well-distributed. Once pressed, set the dish aside.
Step 2: Create the Cream Cheese Layer
Now, let’s move on to the creamy, dreamy layer that sits atop our cookie crust. In a large mixing bowl, beat the softened ½ cup of unsalted butter with the softened 8 oz of cream cheese until it’s light and fluffy. You want to ensure there are no lumps of cream cheese remaining. This is best achieved with an electric mixer, but a sturdy whisk and some elbow grease will work too. Next, gradually add the 1 cup of powdered sugar, mixing until well combined and smooth. Stir in the 1 teaspoon of vanilla extract. Finally, gently fold in 1 cup of Cool Whip. The Cool Whip lightens the mixture and makes it extra airy and spreadable. Carefully spread this luscious cream cheese mixture evenly over the prepared Oreo crust in the baking dish. Make sure to get it all the way to the edges for a uniform layer.
Step 3: Make the Chocolate Pudding Layers
This is where the chocolate decadence truly begin extracts! In a separate large bowl, whisk together the 2 (3.9 oz.) packages of chocolate instant pudding with the 2 and 3/4 cups of cold milk. Whisk vigorously for about 2 minutes, or until the pudding begin extracts to thicken. It’s important to use cold milk for the pudding to set properly. Once thickened, let it sit for about 5 minutes to allow it to set further. Then, gently pour this chocolate pudding mixture over the cream cheese layer in the baking dish. Try to pour it evenly across the surface to avoid creating any uneven spots. You want a smooth, unbroken layer of rich chocolate pudding.
Step 4: Add the Final Cool Whip Topping
For the crowning glory of our Easter Chocolate Lasagna, we’ll add a cloud of whipped topping. Take the remaining 2 cups of Cool Whip and gently spread it evenly over the set chocolate pudding layer. Use a spatula to create a smooth, even surface. This topping adds a wonderful lightness and a beautiful contrast to the denser layers below. Don’t worry about making it perfectly smooth; a slightly textured finish can be quite appealing. This is the canvas for our festive decorations, so make it as inviting as possible.
Step 5: Decorate and Chill
The fun doesn’t stop at the layers! Now it’s time to make this Easter Chocolate Lasagna truly festive. Sprinkle the 1 ½ cups of crushed Oreo cookies over the top of the Cool Whip layer. This adds another delightful crunchy element and looks like freshly dug earth, which is perfect for an Easter theme! Now for the real showstopper: arrange your Peeps bunnies artistically across the top. You can place them in rows, in little groups, or scattered about like they’re hopping through a chocolate meadow. Then, strategically place your Easter egg candies among the Peeps and cookie crum extractbs. Get creative! Once decorated, cover the baking dish tightly with plastic wrap. It’s essential to chill this dessert in the refrigerator for at least 4 hours, or preferably overnight. This chilling time allows all the layers to set firmly, making it easy to cut and serve, and for the flavors to meld beautifully. The longer it chills, the better it will taste and the cleaner your slices will be. Enjoy this delightful Easter creation!
Conclusion:
And there you have it – your guide to creating an unforgettable Easter Chocolate Lasagna! This decadent dessert is truly a showstopper, layering creamy chocolate pudding, luscious cheesecake filling, and crushed chocolate cookies for an explosion of flavor and texture in every bite. It’s the perfect way to celebrate Easter, offering a delightful twist on traditional treats that’s sure to impress your family and friends. Its no-bake nature makes it incredibly easy to assemble, leaving you more time to enjoy the festivities.
For serving suggestions, I love to top this Easter Chocolate Lasagna with a dollop of whipped cream, a sprinkle of chocolate shavings, or even some fresh berries for a pop of color. For variations, consider adding a layer of crushed Oreos instead of grabeef ham crackers for an extra chocolatey crunch, or swirl in some peanut butter to the cheesecake layer for a Reese’s-inspired delight. Don’t be afraid to get creative!
I truly encourage you to give this Easter Chocolate Lasagna recipe a try. It’s a guaranteed crowd-pleaser and a wonderful way to add a touch of homemade magic to your Easter celebrations. Happy baking!
Frequently Asked Questions about Easter Chocolate Lasagna:
Can I make this Easter Chocolate Lasagna ahead of time?
Absolutely! In fact, I highly recommend making it at least 4-6 hours, or even a day, in advance. This allows the flavors to meld beautifully and the layers to set up properly, resulting in a more cohesive and delicious dessert. Just be sure to cover it tightly with plastic wrap before refrigerating.
What kind of chocolate should I use for the pudding layer?
You can use either instant chocolate pudding mix or make your own from scratch. If using a mix, follow the package directions. If you prefer to make it from scratch, use good quality cocoa powder for a richer chocolate flavor. Using semi-sweet or dark chocolate chips melted into your pudding mixture can also add an extra layer of indulgence.
Easter Chocolate Lasagna
A festive and no-bake layered dessert featuring Oreo crust, creamy pudding layers, and fluffy whipped topping, perfect for Easter celebrations.
Ingredients
-
36 Oreo cookies, crushed
-
1/2 cup unsalted butter, melted
-
1/2 cup unsalted butter, softened
-
1 cup powdered sugar
-
8 oz cream cheese, softened
-
1 teaspoon vanilla extract
-
1 cup Cool Whip
-
2 (3.9 oz.) packages chocolate instant pudding
-
2 and 3/4 cups cold milk
-
2 cups Cool Whip
-
1 1/2 cups crushed Oreo cookies
-
Peeps bunnies, for decoration
-
Easter egg candies, for decoration
Instructions
-
Step 1
Prepare the crust: In a bowl, combine crushed Oreo cookies and melted butter. Press mixture into the bottom of a 9×13 inch baking dish. -
Step 2
Make the cream cheese layer: In a separate bowl, beat softened butter and powdered sugar until creamy. Add softened cream cheese and vanilla extract, beat until smooth. Fold in 1 cup of Cool Whip. -
Step 3
Spread the cream cheese mixture evenly over the Oreo crust. -
Step 4
Prepare the pudding layers: Whisk together chocolate instant pudding packages and cold milk in a bowl until well combined and thickened. -
Step 5
Spread the thickened pudding over the cream cheese layer. -
Step 6
Top with 2 cups of Cool Whip and sprinkle with crushed Oreo cookies. -
Step 7
Decorate with Peeps bunnies and Easter egg candies. -
Step 8
Chill for at least 4 hours or overnight before serving.
Important Information
Nutrition Facts (Per Serving)
It is important to consider this information as approximate and not to use it as definitive health advice.
Allergy Information
Please check ingredients for potential allergens and consult a health professional if in doubt.